I found my camera charger! What does this mean? A much happier Stephi and pictures for you :) Some of the crafts are much harder to describe without them. So...lets get down to business.
First of all, I just randomly threw together Hershey's Hot Fudge Pudding Cake, and it smells so yummy, I can't wait! This is a very easy recipe but a little tricky, so I highly suggest that you give the directions a once-over before you make it. It really turns out pudding-like, and who could go wrong with chocolate anyways?
http://allrecipes.com/Recipe/Hersheys--Hot-Fudge-Pudding-Cake/Detail.aspx
Ps. It amazing with vanilla ice cream fresh out of the oven!
I also made a hat today....seems weird in the middle of the summer, right? I would deem it one of those, throw-it-on-when-my-hair-looks-like-crap hats :) That and it's comfy too. I modified it a little since the main reason I don't like crocheting in the round is because when I single crochet, I always lose where I started even if I mark it with my trusty dusty bobby pin. That and I made it a little more "holey" so that I could where it even when it was hot. Here is the original pattern:
http://jessicasuzanne.com/craftypants/2007/09/13/pretty-puffs-slouchy-hat-with-pattern/
I used cotton yarn so that it wouldn't be hot. I skipped all the single crochets except for the end, and on rounds 6, 7, and 8, I double crochet, chain, double crochet, etc. However, since I skipped all the single crochets, I am going to go back to put in one or two more rows of double crochet so it is longer.
I finished the black diamond scarf with pockets. YEY! Sad to say I forgot to take a picture before I sent it out :( But I can assure you that it turned out very well. It was about 9" wide and almost 7' long, and it took two skeins of yarn.
Every year we make Xmas presents for our whole family. I originally found a pinecone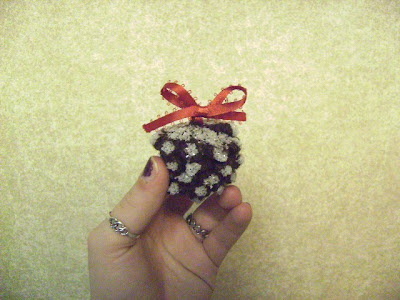 pattern, but quickly found out that it was a little too difficult for my taste. I just so happened I found another pattern that turned out to be really easy so we can make pinecone ornaments. (I hope no one in my family is reading this so the surprise isn't spoiled :))
http://planetmfiles.com/2008/12/18/free-crochet-pine-cone-pattern/
I don't think it's decorated enough, if that makes sense. I was thinking of also adding smaller bells on top or something green. I was also toying with the idea of making it bigger by using a larger hook or making a longer chain at the beginning.
This past week, I reconstructed a green shirt I picked up for about .50 at a thrift store. I loved the color of it, but it had no style. So I pulled out my scissors and got down to business. I cut off the collar around the stitching and set it aside. I wanted to make the front of the shirt to scoop further down than the back, so I folded it sideways so that the sleeve was on top of the other sleeve. By folding it this way, there was a crease down the middle of the back as well as the middle of the front. I cut the front of the shirt, following the neckline's scoop so that it would maintain the same shape, but just be lower. I also zig-zag stitched around the neckline so that the shoulders would not come undone. In the middle of the shirt I made 6 holes, 3 on either side. Taking the collar, I cut the stitching off and pulled it taught. I laced it through the holes and tada! Way more interesting than it was before. I haven't decided whether I want to make more holes to lace it, use some ribbon instead of the color, or add something to the sleeves.
Finally, we've made it to the last project that I made. Pierogies! These are a little challenging to make and they take some time, but they are so good! I got this recipe off the internet years and years ago.
Pierogies
4-5 c. flour
2 t. salt
2 eggs, beaten
1/2-1 c. water
2 T. oil
Mix all ingredients. Knead 8-10 minutes and cover with plastic wrap for 30 minutes. Roll 1/8" on floured surface, and cur with large glass. Place filling in cener and wet edges with water and weal with a fork. Cook 5-7 minutes in boiling salted water.
Filling:
2 T. butter
1 onion, minced
Potatoes (4?)
2 T. sour cream
2 t. salt
1 t. pepper
Saute onions in margarine and boil potatoes in salted water until soft. Drain, mash, add onions, and then add other ingredients.
When I make this recipe, I never use the filling suggested. I use instant mashed potatoes, either already seasoned or I season them myself typically with garlic, parsley, or Italian seasoning. I sometimes put broccoli, onions, garlic, or cheddar cheese in them as well. There are many different recipes for filling online that have meat or sauerkraut in them as well. I have made them with veggies, Italian seasoning, and mozzarella cheese as a filling. I also don't knead it for 8-10 minutes...I knead it until I think it's done which is about 5 minutes, lol. I have a pierogie maker....very good investment. I have found out that the pierogies are done they float, so I don't pay attention to how long they have been boiling either. After I have made them, I serve them with pasta sauce, or fry them up with garlic, onions, and green peppers with a little bit of garlic pepper....yum!
This recipe is also a good basic recipe for dough. You can make turnover-type things by substituting the salt for cinnamon sugar or just cinnamon and using pie filling. If you make this, I would also omit the salt in the water when boiling it. This is the dumpling recipe I use as well. When I am making the pierogies, sometimes the filling gets mixed in with the dough, so I just throw it in the boiling water to cook separately. The pierogies and dumplings freeze really well (before they are fried) so you can make soup later with the dumplings, or if you have extra pierogies, freeze them so you don't have to make dinner after one of those really long days at work.

Oh, one more thing....doodled on myself today with more henna. I peeled the henna off early to see if it would still darken as much as the other ones did when I left them on longer. That and it feels weird with something on your skin like that.
See ya later, and Happy Crafting!
First of all, I just randomly threw together Hershey's Hot Fudge Pudding Cake, and it smells so yummy, I can't wait! This is a very easy recipe but a little tricky, so I highly suggest that you give the directions a once-over before you make it. It really turns out pudding-like, and who could go wrong with chocolate anyways?
http://allrecipes.com/Recipe/Hersheys--Hot-Fudge-Pudding-Cake/Detail.aspx
Ps. It amazing with vanilla ice cream fresh out of the oven!
I also made a hat today....seems weird in the middle of the summer, right? I would
 deem it one of those, throw-it-on-when-my-hair-looks-like-crap hats :) That and it's comfy too. I modified it a little since the main reason I don't like crocheting in the round is because when I single crochet, I always lose where I started even if I mark it with my trusty dusty bobby pin. That and I made it a little more "holey" so that I could where it even when it was hot. Here is the original pattern:
http://jessicasuzanne.com/craftypants/2007/09/13/pretty-puffs-slouchy-hat-with-pattern/
I used cotton yarn so that it wouldn't be hot. I skipped all the single crochets except for the end, and on rounds 6, 7, and 8, I double crochet, chain, double crochet, etc. However, since I skipped all the single crochets, I am going to go back to put in one or two more rows of double crochet so it is longer.
I finished the black diamond scarf with pockets. YEY! Sad to say I forgot to take a picture before I sent it out :( But I can assure you that it turned out very well. It was about 9" wide and almost 7' long, and it took two skeins of yarn.
Every year we make Xmas presents for our whole family. I originally found a pinecone
 pattern, but quickly found out that it was a little too difficult for my taste. I just so happened I found another pattern that turned out to be really easy so we can make pinecone ornaments. (I hope no one in my family is reading this so the surprise isn't spoiled :))
http://planetmfiles.com/2008/12/18/free-crochet-pine-cone-pattern/
I don't think it's decorated enough, if that makes sense. I was thinking of also adding smaller bells on top or something green. I was also toying with the idea of making it bigger by using a larger hook or making a longer chain at the beginning.
This past week, I reconstructed a green shirt I picked up for about .50 at a thrift store. I
 loved the color of it, but it had no style. So I pulled out my scissors and got down to business. I cut off the collar around the stitching and set it aside. I wanted to make the front of the shirt to scoop further down than the back, so I folded it sideways so that the sleeve was on top of the other sleeve. By folding it this way, there was a crease down the middle of the back as well as the middle of the front. I cut the front of the shirt, following the neckline's scoop so that it would maintain the same shape, but just be lower. I also zig-zag stitched around the neckline so that the shoulders would not come undone. In the middle of the shirt I made 6 holes, 3 on either side. Taking the collar, I cut the stitching off and pulled it taught. I laced it through the holes and tada! Way more interesting than it was before. I haven't decided whether I want to make more holes to lace it, use some ribbon instead of the color, or add something to the sleeves.
Finally, we've made it to the last project that I made. Pierogies! These are a little challenging to make and they take some time, but they are so good! I got this recipe off the internet years and years ago.
Pierogies
4-5 c. flour
2 t. salt
2 eggs, beaten
1/2-1 c. water
2 T. oil
Mix all ingredients. Knead 8-10 minutes and cover with plastic wrap for 30 minutes. Roll 1/8" on floured surface, and cur with large glass. Place filling in cener and wet edges with water and weal with a fork. Cook 5-7 minutes in boiling salted water.
Filling:
2 T. butter
1 onion, minced
Potatoes (4?)
2 T. sour cream
2 t. salt
1 t. pepper
Saute onions in margarine and boil potatoes in salted water until soft. Drain, mash, add onions, and then add other ingredients.
When I make this recipe, I never use the filling suggested. I use instant mashed potatoes, either already seasoned or I season them myself typically with garlic, parsley, or Italian seasoning. I sometimes put broccoli, onions, garlic, or cheddar cheese in them as well. There are many different recipes for filling online that have meat or sauerkraut in them as well. I have made them with veggies, Italian seasoning, and mozzarella cheese as a filling. I also don't knead it for 8-10 minutes...I knead it until I think it's done which is about 5 minutes, lol. I have a pierogie maker....very good investment. I have found out that the pierogies are done they float, so I don't pay attention to how long they have been boiling either. After I have made them, I serve them with pasta sauce, or fry them up with garlic, onions, and green peppers with a little bit of garlic pepper....yum!
This recipe is also a good basic recipe for dough. You can make turnover-type things by substituting the salt for cinnamon sugar or just cinnamon and using pie filling. If you make this, I would also omit the salt in the water when boiling it. This is the dumpling recipe I use as well. When I am making the pierogies, sometimes the filling gets mixed in with the dough, so I just throw it in the boiling water to cook separately. The pierogies and dumplings freeze really well (before they are fried) so you can make soup later with the dumplings, or if you have extra pierogies, freeze them so you don't have to make dinner after one of those really long days at work.

Oh, one more thing....doodled on myself today with more henna. I peeled the henna off early to see if it would still darken as much as the other ones did when I left them on longer. That and it feels weird with something on your skin like that.
See ya later, and Happy Crafting!
Almost finished with my half of pinecones...but I am not doing ribbon and glitter till I get yours..cause for somereason I don't think mine look as good!
ReplyDelete