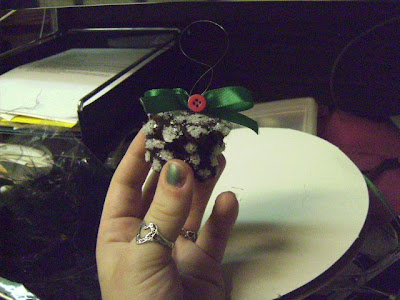
 I finished all the pinecones (YEY) for the family. Now to decorate them? I liked both of these the best because it only seemed fitting to decorate with both green and red :) This one is just a green bow with a button glued on it. The "snow" is not glitter, it's called "Diamond Dust" by Twinklets. I found out that it's actually ground up glass...but it's so fine, that it won't cut you, so no worries. Awesome way to recycle glass :)


This pinecone is just 3" pieces of ribbon glued together with pony beads glued on top. To make, take your section of ribbon and place the ends on top of each other, right side of the ribbon facing up. The ribbon will make the loop itself. I glued the beads on there to make it look like holly and to cover up the ribbon where it was glued. Really easy. I also tied some fishing line onto it BEFORE I glued down the ribbon so that it could be hung (p.s. glue the "holly" on top of the knot on the string).
I finished my wings! I love how they turned out, and they were so easy to make! I decided to change the shape of the wings and go for a more "pointy" look. To finish them, I picked up a pair of black knee highs for .50 at Goodwill....still in the packaging, never used. I tied one over each side, and covered the knot in the middle with wide ribbon. I just used regular elmers and a paint brush to put on the feathers (i put glue on the stretched knee highs and the feathers). I also found out that my wings were not the same size, so I just faked it by putting more feathers on one side. I tied two
lengths of ribbon around the middle so that I could tie my wings on.
I had a lot of fun making this curtain for Halloween. I got the idea off of Threadbanger.com. It's a Dollar store plastic curtain and 50 cent paint. Cheap, easy. In the episode on Threadbanger, they take it outside, but feeling lucky, I just left it to hang in the bathroom, which actually worked out better because then the paint could drip, making it more realistic. They also used a large paintbrush to fling the paint, but since I didn't a big enough paintbrush(my largest artistic one wasn't making the cut....haha, pun) I used a spoon.
I cut the tombstones freehand out of a cardboard box I picked up at work, and "mixed" the paint on the tombstone to give it a more dreary look. The bats and ghosts are just paper cut outs from templates I found online. All you have to do is Google it, there are hundreds of free templates. I just traced a circle for the moon.
Last but not least, I finished my sweater! I was so excited, but as previously mentioned, it is a size too big. It is supposed to be a medium, but it probably fits a large or extra large. I tried it on and looked like a football player. LOL.
Still working on more Halloween and Xmas projects. I have a lot of presents figured out for what to make who, so I'm really proud of myself for starting so early this year. The only bad thing is that they look at my blog so I won't be able to share what I am working on :( Never fear, I will show off my work after the holidays. If you are the crafting type and are looking for ideas, I highly suggest that you visit Craftster.org. It has lots of project ideas and even a spot that you can ask for crafting suggestions on the forum for those loved ones that you are clueless on. Happy Crafting!
Comments
Post a Comment